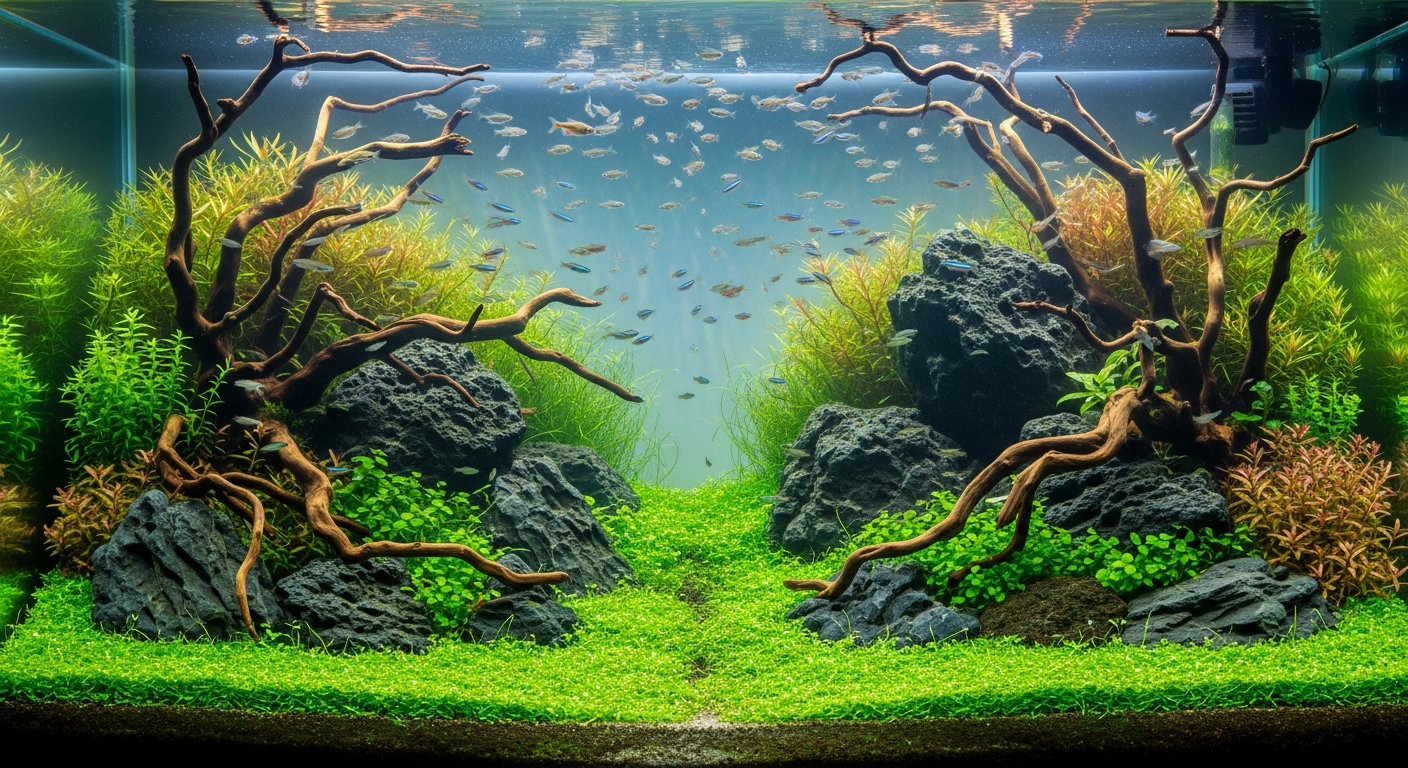
Aquascaping for Beginners: Your First Scape Step by Step
Updated June 2026
Most beginners fill a tank with water, drop in a few plants, and wonder why it looks like a salad rather than a landscape. The difference between that and a scene that stops people mid-scroll is almost never about expensive equipment. It is about understanding a handful of design principles that experienced aquascapers apply before the first rock hits the gravel.
This guide covers every practical step: choosing a style, placing hardscape, picking plants that match your light, and keeping the whole thing healthy long-term. By the end, you will know exactly how to plan and execute your first aquascape.
What Aquascaping Actually Is
Aquascaping treats a fish tank as a three-dimensional canvas. You are not just growing plants underwater; you are composing a scene with depth, perspective, and a clear visual hierarchy.
The practice took its modern form largely through the work of Takashi Amano, a Japanese photographer and aquarist whose Nature Aquarium style brought Japanese garden aesthetics into freshwater tanks in the 1980s. His company ADA (Aqua Design Amano) popularized tools, substrates, and a philosophy of wabi-sabi, the acceptance of natural imperfection, that still shapes the hobby today.
What separates aquascaping from standard fishkeeping is intentionality. Every element serves a compositional purpose. Dead space is used deliberately. Asymmetry is preferred over symmetry because nature is asymmetric.
The Four Main Styles
You do not need to invent your aesthetic from scratch. Four established styles each have distinct rules, and picking one before you buy anything saves you from a tank that looks like it cannot decide what it is.
| Style | Origin | Hardscape | Plant Density | Difficulty |
|---|---|---|---|---|
| Nature Aquarium | Japan (Amano) | Wood + stone, organic shapes | High | Intermediate |
| Iwagumi | Japan (Amano) | Rocks only, odd numbers | Low, carpet-focused | High |
| Jungle | Europe (informal) | Minimal or none | Very high, lush | Low to intermediate |
| Dutch | Netherlands | None | Very high, geometric | High |
For a first scape, the Nature Aquarium style is the most forgiving. It combines driftwood and stone, tolerates a wider range of plants, and the organic shapes make small imperfections read as intentional. Iwagumi is beautiful but unforgiving: a carpet of Hemianthus callitrichoides (HC Cuba) or Eleocharis parvula requires CO2 injection and high light, and any algae outbreak is immediately visible against the bare stone and green mat. Save it for your second or third build.
Jungle style suits anyone who wants visible results quickly with a lower-tech setup. Heavy plant mass shades out algae naturally, and the wild overgrown look means you can skip the geometric precision that Dutch style demands.
The Golden Ratio and Where to Put Your Focal Point
Every successful aquascape has a single visual anchor, the spot your eye travels to first. Place it dead center and the composition looks static. Place it using the golden ratio or the simpler rule of thirds, and the tank develops natural tension and depth.
The rule of thirds divides your tank into a 3×3 grid. Your main hardscape piece, the largest stone or the primary branching point of your driftwood, sits at one of the four intersection points. For a 60 cm tank viewed from the front, that means roughly 20 cm from the left or right edge and about one-third of the way up the tank height.
Beyond placement, you need a foreground, midground, and background. Foreground plants are short and low-growing. Background plants are tall and fill vertical space. The midground connects them, usually with medium-height plants or the base of your hardscape. Without all three layers, a scape looks flat regardless of how good the individual plants are.
Depth Trick for Small Tanks
Use fine-grained substrate and smaller rocks at the back of the tank. Larger grain and larger stones up front exaggerate the sense of distance, the same forced perspective technique used in bonsai and Japanese dry gardens. A 45-liter tank can look twice its actual depth with this one adjustment.
Hardscape First, Always
This is the single rule that separates planned scapes from improvised ones. Place your rocks and wood before you add substrate, before you buy plants, and definitely before you add water.
Dry-scaping, arranging hardscape on a bare tank floor or even on a table with tape marking the tank dimensions, lets you move pieces freely without disturbing a substrate bed. Rocks in water become harder to reposition without clouding the tank and uprooting whatever you have planted.
For rocks, odd numbers work better than even. Three stones of different sizes grouped together creates the tension that two or four does not. The largest stone (called the Oyaishi, or parent stone in Iwagumi terminology) anchors the composition; smaller satellite stones reinforce the direction and energy of the main piece without competing with it.
When sourcing hardscape, stick to rocks you know are inert or low-reactivity. Some stones raise hardness and pH over time, which matters a great deal if you keep soft-water fish or shrimp. Our guide to hardscape-safe rocks covers which stone types are reliable and which ones to skip entirely.
Substrate, Plants, and Matching Them to Your Light
Aquascape substrate is not just decorative. The two main categories are inert substrates (like sand, gravel, and blasting sand) and active or nutritive substrates (like ADA Aqua Soil, Fluval Stratum, and similar cation-exchange formulations).
Active substrates lower pH slightly and buffer water chemistry, which benefits most aquatic plants and is essential for Caridina shrimp. They also contain nutrients that feed plant roots directly, which reduces your dependence on liquid fertilizers early on. The trade-off is cost and a finite nutrient lifespan, typically 12 to 24 months before the buffering capacity is exhausted.
For plant selection, light is the deciding factor, not your enthusiasm for a specific species.
Low-light plants survive on standard LED fixtures without CO2 injection: Anubias, Java fern, Cryptocoryne varieties, and most mosses. These are genuinely beginner-compatible because they tolerate inconsistent fertilization and a range of water parameters.
Medium to high-light plants, including stem plants like Rotala rotundifolia, carpet plants like Glossostigma elatinoides, and demanding foreground plants like HC Cuba, need a quality planted tank LED rated for their depth and often require pressurized CO2 to grow without algae overwhelming them. Our planted tank setup guide maps out the full lighting-to-plant matrix with specific fixture recommendations.
Step-by-Step: Building Your First Aquascape
This sequence is based on how experienced hobbyists approach a new build, not how most beginners stumble into it.
Step 1: Choose your tank size. A 45 to 60 cm tank (roughly 20 to 40 liters) is genuinely easier to aquascape than a small nano tank. Water parameters in smaller volumes swing faster, and there is more room to work with compositionally.
Step 2: Dry-scape your hardscape. Spend at least an hour moving rocks and wood around before committing. Take photos from the front viewing angle. The camera flattens depth in a useful way, showing you how the composition actually reads to a viewer.
Step 3: Add substrate. Slope it from roughly 2 to 3 cm at the front to 5 to 8 cm at the back. The slope creates depth and gives background plants more root space. Use a divider or rocks to hold the substrate berm in place before flooding.
Step 4: Place your hardscape into the substrate. Push stones and wood down so at least one-third of each piece is buried. Floating hardscape looks unnatural and can shift dangerously if fish or shrimp disturb the substrate beneath it.
Step 5: Fill slowly. Place a plastic bag or plate on the substrate and pour water onto it gently to avoid disrupting your slope. Fill to about two-thirds before planting.
Step 6: Plant from back to front. Tall background plants first, then midground, then foreground. Use tweezers to push stems deep enough that they will not float free, but not so deep you bury the growing tip. Foreground carpet plants go in last, and planting them densely from the start speeds establishment.
Step 7: Top off and run your filter. Do not turn on CO2 or dose fertilizers heavily on day one. Let the tank settle for 24 hours and check for leaks and equipment function before adding livestock.
Tools That Actually Matter
You do not need a full ADA tool kit to start. The tools that genuinely improve your results are a quality pair of long-handled curved tweezers, straight scissors for stem plants, and curved scissors for carpet trimming and detail work.
A substrate spatula or sand flattener is useful for leveling fine-grained foreground substrate without disturbing plants. A turkey baster or pipette handles spot-cleaning, removing dead leaves, and targeted fertilizer application without stirring up mulm across the whole tank.
For CO2, if you go that route, a drop checker gives you a continuous visual reference for CO2 concentration. Target the yellow-green zone (around 30 mg/L), not yellow (too much) and not blue-green (too little). A solenoid lets you automate CO2 on and off with your light schedule, which matters because CO2 in a dark tank with no photosynthesis causes a pH crash.
See our full breakdown of best aquascaping tools for specific picks at different price points, including what you can skip without losing results.
Maintenance, Trimming, and Keeping the Scape Intact
A planted tank without a maintenance routine becomes a jungle within six weeks. Not the elegant kind, the kind where your carefully placed midground disappears under an overgrown stem plant canopy.
Trimming frequency depends entirely on your growth rate, which is driven by light intensity and CO2. High-tech setups with CO2 and bright light typically need trimming every one to two weeks. Low-tech setups every three to four weeks. The goal is not to let any plant reach the surface or shade out lower layers.
For stem plants, cut straight across the stem just above a node. The cut stem can be replanted to fill gaps, and the trimmed base will sprout two lateral shoots, thickening the planting over time. For carpets, a flat horizontal cut with curved scissors just above the substrate surface encourages dense lateral growth. Do not scalp carpets to the substrate; leave at least 0.5 cm of growth.
Weekly water changes of 30 to 50 percent are standard for planted tanks. They export nitrates and waste metabolites, replenish trace minerals, and reset the balance that heavy plant growth can shift. Skipping water changes in a high-tech planted tank is one of the fastest routes to a persistent algae problem.
If you want to add shrimp to your aquascape as a cleanup crew, the intersection of water parameters is what matters most. Our guide on Iwagumi for beginners covers shrimp-compatible plant choices in that specific style, including how to manage the water chemistry overlap.
Mistakes That Wreck First Scapes
Buying plants before finalizing hardscape is the single most common error. You end up choosing plants to fill awkward gaps rather than plants that serve the composition. Hardscape first, always.
Understocking plants at setup is the second. An empty-looking tank at day one is not a sign of restraint; it is an invitation for algae. Algae colonizes available light and nutrients faster than plants can establish. Dense planting from day one gives your plants a head start.
Mixing too many species is the third. Beginning scapers often buy one of everything and create a busy, competing landscape. Pick three to four species maximum and use them in bold masses. The tank will look more designed, not less, because your eye has clear groupings to read.
Finally, chasing perfection too early. The first two weeks of a new planted tank are inherently messy: disturbed substrate, plant melt as species adjust from emersed to submersed growth, and a bacterial colony still establishing. Resist the urge to tear it apart and start over. Most first scapes look better at week six than week two.
Marcus Chen
Aquarist & Founder, TanninLab
Marcus has been keeping planted tanks for 14 years. He tests every product recommendation in his own tanks and publishes the raw data.
Last updated: June 2026